Parts of the Kitchen
Making up the kitchen area:
- The sets of drawers
- The benchtop
- The dual induction cooktop
- The sink and (famous) sink bowl
- Fresh water and filtered water supply
- The fridge/freezer
- Fridge/freezer temperature monitors
- Weather station
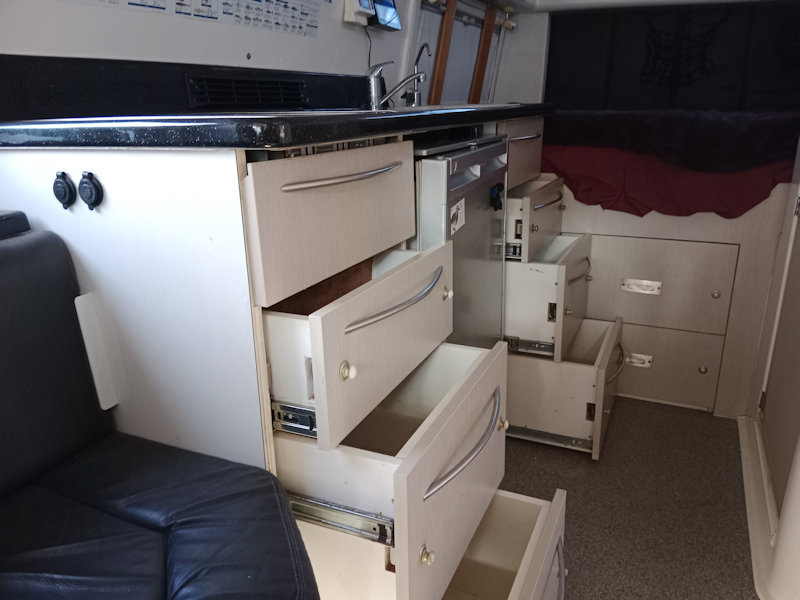
Each of these components can be seen in the photo. They are considered in order.
Drawers
With six drawers and two under-bench storage spaces there is lots of space for day-to-day items.
The right under-bench storage space includes a USB/cigarette socket. The left storage space includes an isolation switch for the cooktop and room for a propane stove for use when the camper battery may be low.
Benchtop
As with all other fittings, the benchtop is fibreglass and requires no special care in use, though it does scratch somewhat.
Induction Cooktop
Jannette cooking up a delicious meal on the cooktop. Both elements at power level 5.
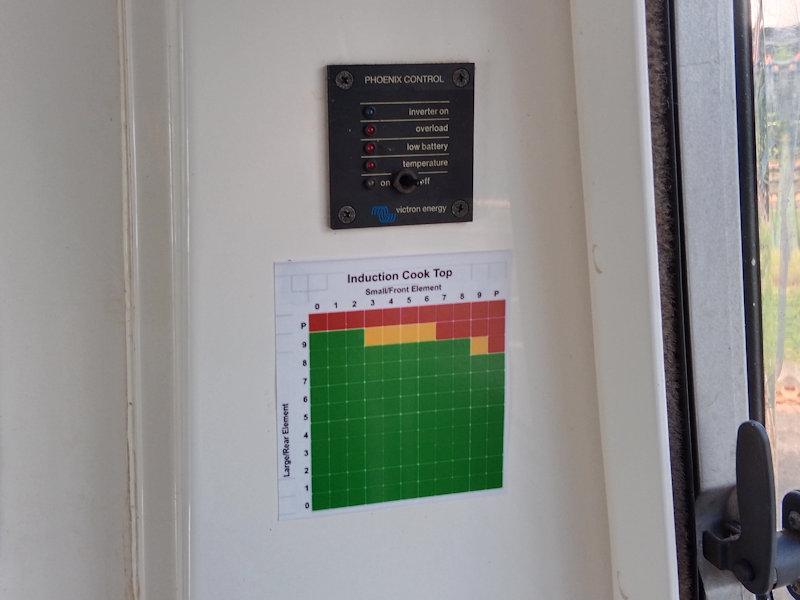
Inverter Remote controller above, chart of cooktop power levels below.
The handbook for the De'Longhi DE302 IB cooktop is included in the manuals collection. The cooktop has a 200mm dia. rear zone and a 160mm dia. front zone. Each has nine power levels + a boost mode: up to 1400W for the front and 3000W for the back. We restrict our usage to a total of ~2500W (~200A DC) to stay within the rating of the inverter. This means taking care using the front element when the rear element is at or near maximum power. A simple chart on the wall helps with this:
On standby the cooktop draws sufficient current to not allow the inverter to drop to sleep mode. To conserve battery, turn off the cooktop once its cooling fan has stopped, either at its isolating switch or at the the inverter control switch on the wall behind the driver's seat.
Sink Board
Made from a polyethylene cutting board this gives a platform for meal preparation and for "things" at other times. It has proven to be very successful.
Water to the Kitchen
The Touch Screen on a good day shows fresh water level (percentage of 185 litres). Fresh water is provided at the sink. If the Heater is run then warm water is also available. A filtered water faucet is on the right.
See Water Management for information on fresh water supply and disposal. Warm water supply is discussed on this page for the Heater.
A drinking water faucet at the sink uses a high quality Seagull X-IF cartridge filter located next to the water pump under the RH camper seat. Replacement cartridges are available from Purifiers Australia.
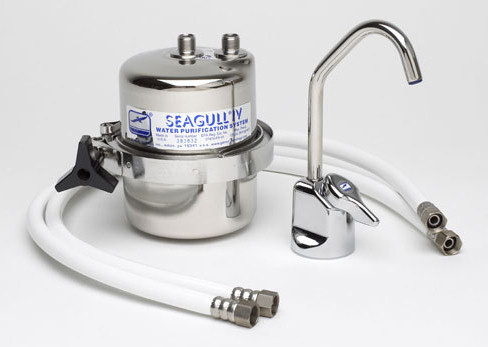
I have only changed this filter twice: once in 2017 and again in 2022. A replacement Seagull IV cartridge was priced at $238 delivered from Purifiers Australia. Instead, I bought two Neo-Pure NP-1SG Replacement water Cartridges off eBay for $189.26 + $56.84 postage from USA. These claim a slightly slower flow rate to ensure optimal contamination reduction.
Fridge/freezer
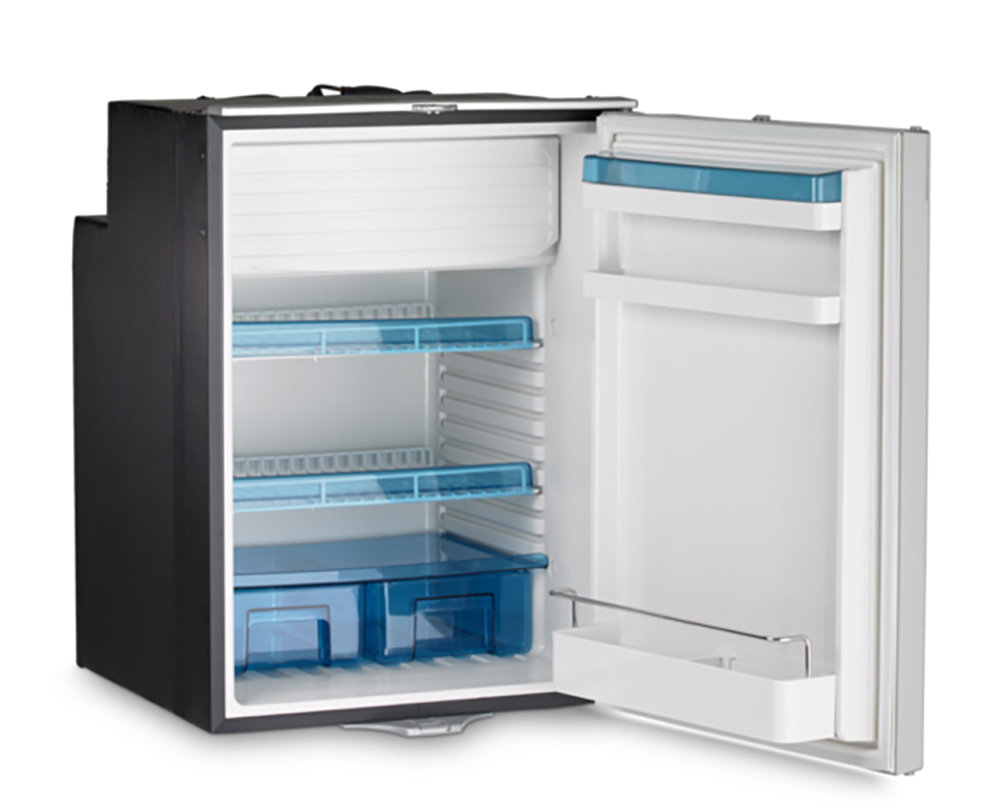 The Waeco CRX110 Fridge/Freeze.
The OEM fridge was a 230V Westinghouse 120 litre Bar Fridge, WIM1200SC modified for 12V. This fridge died, as did its replacement! Eventually we settled on a 110L 12/230V Dometic Waeco CRX110 fridge/freezer which works well. Power consumption is approx. 50 watts @ 25C.
A fan is installed inside at the back of the fridge to circulate the cold air. This fan does cause problems if items in the fridge impact it – move them away. A second external fan is built into the drawer upon which the fridge stands. This fan forces air up past the external components to exit out the vent at the back of the benchtop. A filter material should be positioned in front of the fan intake to reduce the build-up of dust on the fan. Both fans can be controlled by switches on the small panel on the top right of the fridge.
Temperaure in both the fridge and freezer are monitored wirelessly on displays behind the sink. The sensors are powered by pairs of alkaline AA cells.
Weather Station
Jannette refuses to leave the bed in the morning unless she knows the outside and inside temperatures. A DIGOO-branded type is great. The outdoor sensor is cable-tied to a bracket under the RH-Rear lip of the roof and requires two AAA cells.
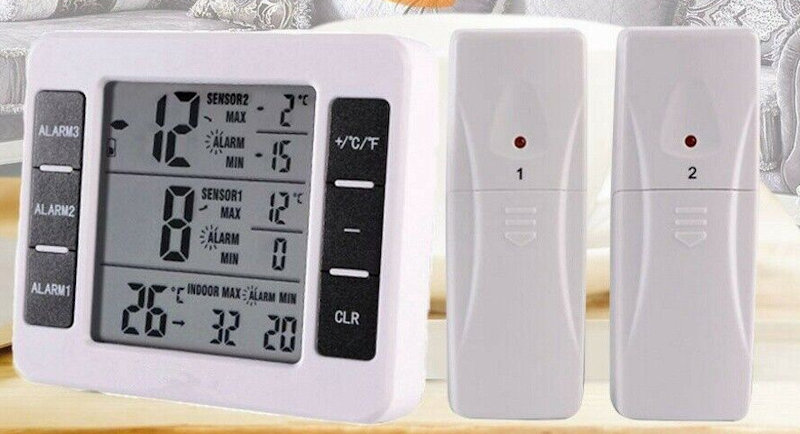
Fridge, Freezer and In-Camper Monitor
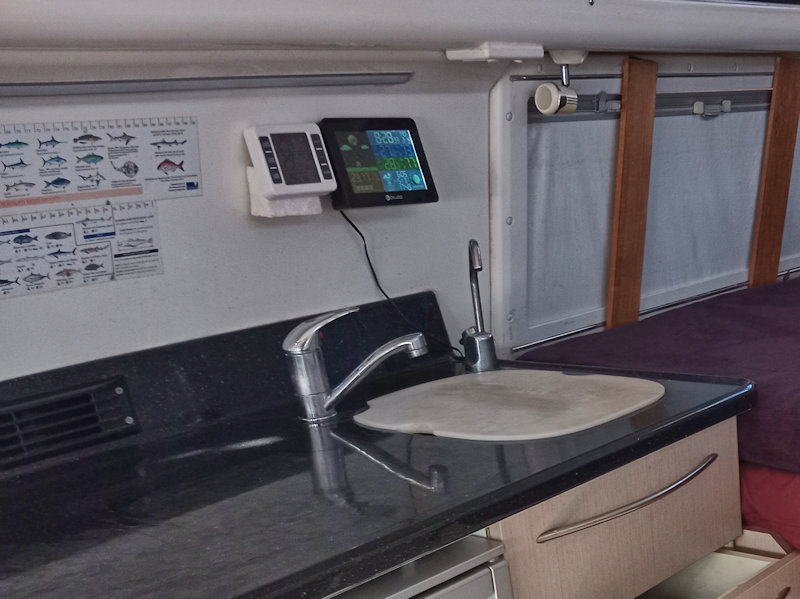
The Monitors on the wall behind the sink.
A purpose cover is over the sink.
Modifications
Drawers
All the drawers are made of fibreglass and are mounted on double extension slides so they come out a long way.
The drawers below the kitchen sink collided with the knobs of the under-bed drawers if they were left unlatched. I cut notches in the drawer edges to clear the knobs. This works very well in practice and saves a lot of potential damage.
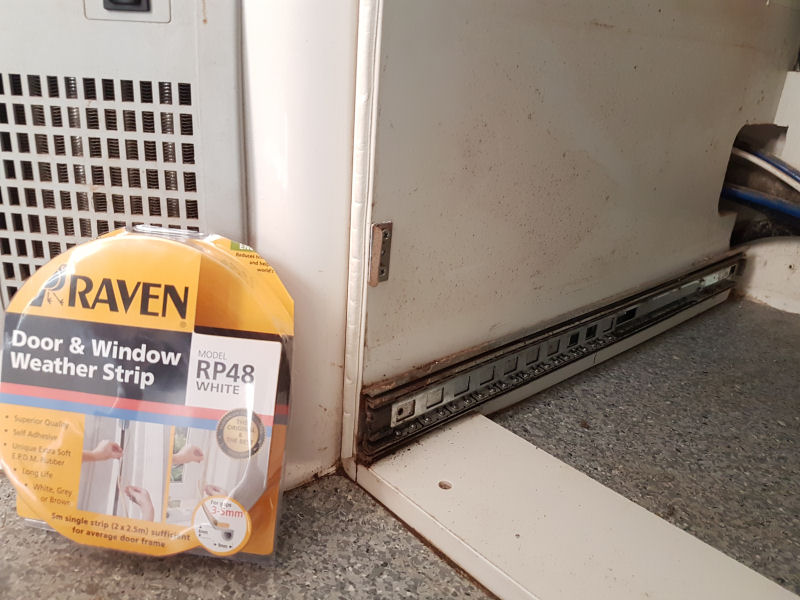
After four years and 100,000km travel, much of it on severely poor roads and tracks, all the kitchen drawers rattled, moving in and out on their runners when latched closed. Apply Raven RP48 weather strip to the vertical edges of the cabinetry. Now the drawers do not rattle and have soft shock absorbers for any larger forces.
Cooktop Selection and Install
We eventually rejected gas cookers because of the fitment, storage and ventilation requirements, and the difficulties we have experienced in the past in refilling the bottles. Fuel stoves were rejected because of their danger and fumes. The Webasto diesel cooktop was rejected because it is slow to start and it is difficult to cook a complex meal using its graded heated area. This left electric, and induction electric was the obvious choice.
It took a lot of effort to decide on the De'Longhi. We deemed a two-area stove as essential, as is the ability to start at low power levels to be kind to the inverter and to food preparation. It had to fit in the space available, so one cooking element has to be in front of the other and is restricted to a total depth of no more than 510 mm.
We experimented with induction cooktops, first purchasing a $50 one off eBay. This proved to be a waste of money: it would only start on full power (2000 W), pulsed the power badly to achieve the few lower settings, would not work at low enough average power levels, and was hard to operate. A second cooktop, an Ecoheat Induction Cooktop costing twice as much (but presently for sale for a ridiculously high price), is much better. It starts up at 500 W, and is rated at 500 W, 1000 W, 1500 W and 2000 W. It also pulses strongly but at least there is the chance to operate it off a smaller inverter. Its major problem is that it is big; there is no chance of having two areas for cooking on the TT30 benchtop using this cooker.
Of the several correctly oriented two-area cooktops we considered, the De'Longhi is both small enough to fit the space available and of sufficient quality to justify the effort and expense in making the necessary changes.
Installation of Cooktop
Talk about 'measure twice and cut once'! Cutting the massive hole in the benchtop for the De'Longhi (270 mm x 490 mm) is not for the faint hearted, but was not difficult: masking tape, a hole saw, jigsaw and multi-function tool made quick work of it. There is enough bench material at the front to keep adequate strength there.
A start in cutting out the space for the De'Longhi Cooktop.
The cutout for the Cooktop is finished.
The De'Longhi Induction Cooktop in position, ready for use.
The cooktop requires good ventilation. Air is able to rise up from behind the fridge, into the space behind the drawers, through two grates in the floor of the top compartment, and out the front through a gap in the top drop-down door below the cooktop. Given the relatively short times the cooktop is actually used, the provided ventilation is more than adequate.
A hole for ventilation is visible near the bottom on the right of the drawer space. The rear of the shelf has two large holes for ventilation into the cooktop space.
View of the cooktop space. The isolation switch is on the left, as is the 15 A surface mount socket for the De'Longhi Induction Cooktop. Ventilation grills on the shelf at the back.
Just below the front lip of the Cooktop, the top of the drop-down door is cut away to provide ventilation so warmed air can be expelled. Above the cooktop, a ventilation fan can expell fumes out of the camper through a skirt window.
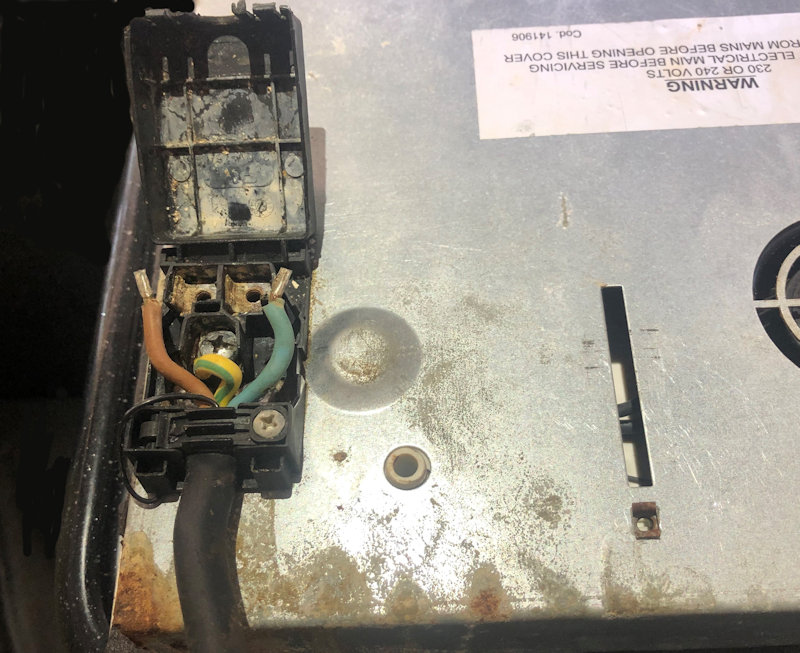
The De'Longhi electrical junction box showing signs of moisture ingress.
Cooktop Problems
The De'Longhi has been incredibly reliable for a long time. However on two occasions now, the earth leakage detector on the 230V Safety Switch has tripped due to moisture entering the junction box at the base of the cooktop due to poor sealing between the cooktop and the kitchen bench. Water inevitably pools at the benchtop corner nearest the junction box and found its way into the junction box. Better sealing should now have fixed this.
More recently the smaller element stopped working. A strip-down revealed that one of the large toroid coils had broken away from the circuit board. Held there only by the two ends of the winding, road vibrations had undoubtedly caused fatigue failure. I repaired the connections and glued the toroid in place with silicone filler.
Extraction Fan
Cooking produces lots of fumes and vapours that need to be expelled from the camper. Our solution is to mount a Caframo Sirocco Model 807 Fan, the same as that over the bed, to direct air out the pop-top screen above the cooktop. The fan can be turned to blow inwards at other times. The new fan is mounted so the pop-top skirt can bunch inwards without damaging the fan. It is wired into the reading light cable above the seat next to the cooktop.
Caframo Sirocco 807 fan mounted on the ceiling. Pop-top up, skirt window open.
With the speaker removed, the wiring in the roof is exposed. The fan wires are snap-locked into the circuit for the reading light.

The Caframo fan was purchased from a good supplier on eBay, located near TravelTrucks. The fan has three speeds, is gimbal mounted, and has a low current draw of under 0.5 A.
Fridge Internal Fan
An internal fan, running all the time the fridge is on, was somewhat successful in my previous motorhome in keeping fridge internal temperature variations small, but there were problems with the fan taking up too much space.
Cooling pads for notebook computers have exceptionally thin fans, and a slim one from MSY is very suitable. It is less than 20 mm thick, runs off a 5V USB port and has a metal mesh guard. It is a slow speed (1200 rpm) 200 mm dia. fan and consumes less than 1.75 W (133 mA at 13.2 V).
I disassembled the Cooler Pad, discarded the plastic base and attached the fan to the metal mesh. Six 17 mm high wooden dowels were hot-melt glued to the mesh to act as standoffs. A USB cable was threaded into the fridge compartment through an existing hole and connected to the fan. The whole fits snugly behind the shelves, and runs very quietly.
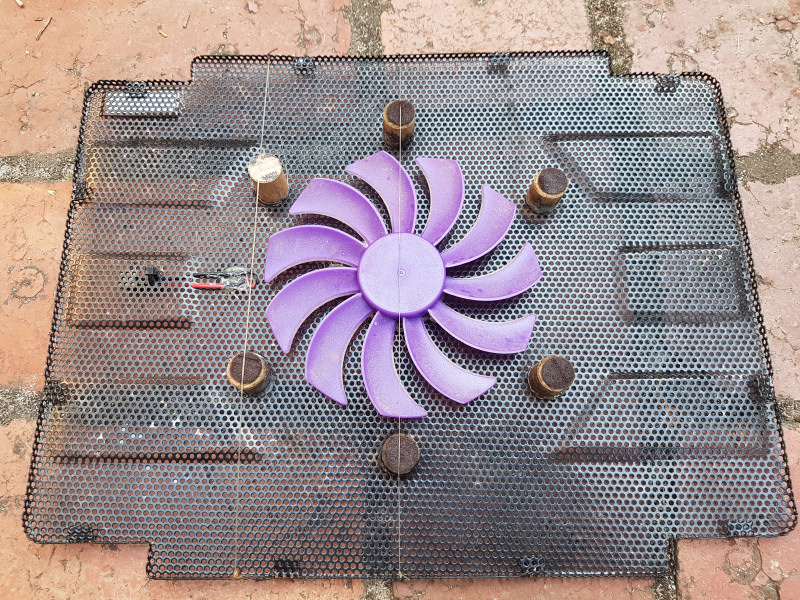
Cooler Pad fan installed in/on the mesh; standoffs glued on.
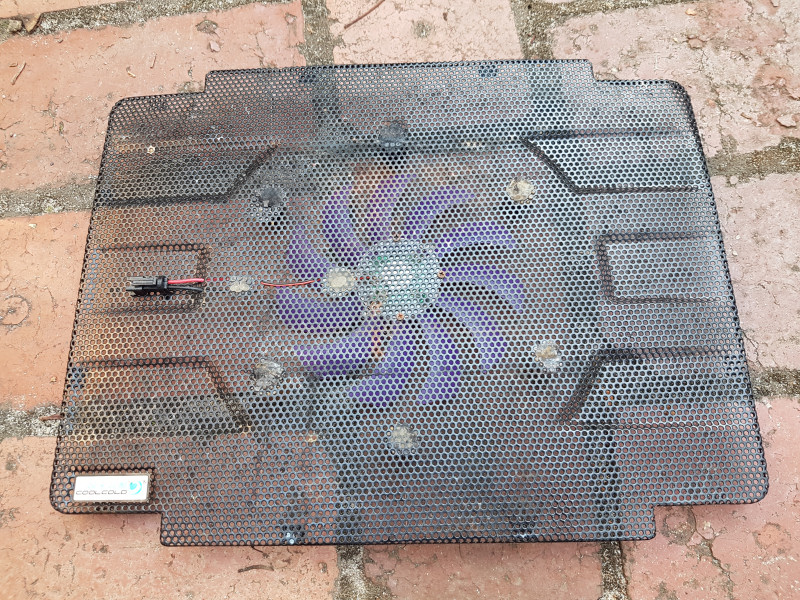
The 5 Volt connector is on the outside of the mesh.
The fan is held in position by the shelves. The LEDs give some comfort.
LINKS
