
Window and Door Glazing
We purchased this house in the knowledge that almost all the windows and some doors required attention because of severe neglect. Most of the casement windows and their frames are rotten and do not seal nor open. The ground floor sash windows are better, but several have broken glass and do not open.
First Effort
On 20 May 2010, Alligator Glass replaced the kitchen window and two windows in the family room adjacent to the patio doors with insulated glass units.
- Kitchen window: 4 mm clear toughened 16 mm air 4 mm clear float. 1086 x 1827
- Side window: 4 mm clear toughened 16 mm air 4 mm clear float. 1517 x 1110
- Side window (next to door): 4 mm clear toughened 16 mm air 4 mm clear toughened. 1517 x 960.
Total cost: $1,353.00.
Pool Room Roof
On 22 April 2010, we contracted Alligator Glass to replace all the roof glass over the indoor pool. Seven sheets of the existing glass were broken, the glass was delaminating with water entering the layers, and the wooden cover framing was rotting.
A major motivation was to make the glass roof maintenance-free since the planned additon of solar panels would make access more difficult.
Robert Hirsch of Alligator Glass quoted $17,094 for the job using 12.38 mm laminated glass and purpose aluminium framing. ViewTech Glass quoted $33,550 for the same work and were VERY slow to do so.
Starting 20 May 2010 the crew from Alligator Glass took three days to do the job. A good result. An extra charge of $473 for scaffolding.
")
Data from Viridian Glass on OptiView Laminate shows that UV trans- mission is less than 1% for UV wavelengths in the range 300–380 nm.
The conclusion is that the laminated glass very effectively protects people in the pool room from both UVA and UVB radiation.
Bedroom 3 West Window
The diamond leadlight of this window, a very attractive feature of the house, had collapsed and the window had been boarded up. Fortunately there was not much rot.
After removing the window, I restored the casing, including applying Porion Filler between the casing and the house brickwork, applied Builders Bog to the sill and sanded it all back. Three coats of gloss black Dulux Weathershield paint to the outside, and a matched low sheen paint inside had the frame back to health.
The window itself was much more work:
- I removed all the lead light from the window
- I fitted a new lower rail made from Victorian Ash in place of the split and rotten one
- I routed away the moulding that located the glass all around
- I bought an insulated glass unit through Alligator Glass for $108.00. It is 3mm glass, 9.5mm gap, 3mm glass, 611 x 1310mm in size which is 5mm smaller than the frame.
- The glass unit was glued into the frame using black silicone glass adhesive, locating the unit 2–3mm from the inside face of the frame
- I remade the whole leadlight panel, using new lead cames (profile 9B) and replacing a few diamond and edge pieces of 3mm glass that were too damaged
- Since there would be no space for a central strengthening bar for the leadlight, I soldered a galvanised steel washer to the crossed cames near the centre of the window pane, and cemented a 20mm dia. rare-earth magnet to the corresponding place on the insulated glass unit using Fullers Toolbox urethane cement
- The remade leadlight was then set into the window frame on the outside and cemented in place using more black silicone adhesive. Since the adhesive is only on the outside of the lead, it should be possible to cut the leadlight out if future repair is necessary.
The result is a window that is in effect triple glazed. It is heavy but the casing hinges are easily able to cope.
To exclude drafts, Raven RP59 window and door weather strip (for gaps 2–4mm) was applied all round on the outer face of the casing where the window sits, except on the side that is hinged. There it was applied to the side jamb so the window closes onto it.
Fly Screen
These casement windows with their brass casement stays are difficult to fit with a flyscreen. The stay gets in the way.
My solution is to make the flyscreen from aluminium framing narrow enough so that it clears the stay, and close the gap with timber edging. A slot is left for the stay to pass through when the window is held open. The result is a flyscreen that is not bulky and does not block the window to any great extent.
")
- Beige aluminium framing is mitred and joined with aluminium internal corner pieces
- Fibreglass mesh is rolled into place using 5mm PVC spline
- Two pieces of wood are attached to the left side of the frame so a gap of 20mm is left to allow for the window stay to pass through when the window is open. The wood is attached using screws in deeply counterbored holes
- The gap between the pieces of wood is closed off using Raven RP2B brush strip seal wedged into routed grooves in the endgrain
- A small brass Prestige D-shaped handle is fitted to the frame next to the gap for the window stay
- Plastic flyscreen friction hinges are fitted top and bottom to the casement frame so the flyscreen can be opened out of the way and even removed when adjusting the window
- Raven RP48 seal tape is stuck to the wood edge of the flyscreen to seal the gap with the casement frame, and so provide enough friction to keep the flyscreen closed in position.
Bedroom 2 West Windows
For the northern of the two of the windows, a slightly different approach taken: repair and paint the window frame after routing away the moulding; repair the window surround, including filling a deep rotted section with builder's bog and pieces of timber; fit the double glaze unit to the frame; rehang the window; repair the leadlight by soldering up the numerous breaks at cross-over points and fit it to the window.
The IGU for the northern window was again 3mm clear float, 9.5mm black spacer, 3mm clear float; 1305 x 607mm (actually 5mm too small, so some of the window moulding was left in place to reduce the gap to 5mm, as it should have been).
The southern of the two windows had too many breaks in the lead cames. Using new Paragon 5 (for the
edges) and 9B (for the diamonds)
lead cames obtained from Moorabbin Glass,
I rebuilt the whole leadlight, replacing a few broken panels by cutting new ones from 3 mm glass. A
good tutorial/refresher on lead-lighting is available
here.


Bedroom 2 South Windows
Yet another approach. I repaired and painted the window frames after routing away some of the moulding to leave a 10mm wide x 8mm deep ledge on the inside face of the frames to take magnetic strip. This time the rebuilt diamond leadlight and a 3mm thick sheet of acrylic plastic will make up the window. Acrylic plastic is a much better insulator than glass and by sticking magnetic strip to the edge, can be put in place and removed using a suction cup.
One diamond leadlight was in poor condition for one window and had to be replaced; the other just required soldering up numerous breaks.
The frames were not too bad. The bottom rails were salvagable by forcing glue into the cracks and compressing the rails with clamps. The strengthening bar could be retained and helps stop movement of the leadlight. New hinges had to be bought because the originals were in such poor condition. The hinges are Whitco 200 mm Narrow Friction Stays, Galvanised, W020301.
Bedroom 1 Windows and Door
The approach of using acrylic plastic to make up the double-glazed unit is used here too.
The outside door was removed and planed down so it would open more easily. The lower ply panel was covered in a piece of cement sheet on the outside, and by seven lengths of Victorian ash flooring on the inside. This improves the thermal performance of the door, and gives it more security.
Bedroom 3 North Windows

The approach of using acrylic plastic to make up the double-glazed unit is used here too. All the hinges had to be replaced, a frame lintel had to be replace because it was rotten with borer. And the window sill was clad in a sheet of black colorbond bent up by McKinna's Sheet Metal.
A second piece of cladding was ordered at the same time for the North sill in Bedroom 4.
Insulating Windows
Windows. Enerlogic35 has a Solar Heat Gain Coefficient of 0.24. WERS Generic Timber double glazed window, 3/6/3+VEP35, MEP-004-23 is 69% better cooling, 36% better heating, than standard single glazed unit. Total Window Uw=2.4 SHGC=0.25 Tvw=0.25 Air Inf=5.00 See WERS Films
The air gap between the panes is generally between 8mm to 22mm thick. The thickness has a substantial impact on the insulating properties. A 16mm air gap is considered the optimum thickness and is usually recommended by most users.
Double glazing is an effective way to reduce U-value, but its impact on solar heat gain depends on the type of glass. One layer of clear glass has a SHGC of 0.86. Two layers have a combined SHGC of about 0.76. This may be reduced much further by using tinted, low-e or spectrally selective low-e coatings. Because low-e coatings also reduce radiative heat transfer compared to uncoated glass, the glazing system U-value may be halved again, especially if the air between the panes is replaced by argon gas. http://www.yourhome.gov.au/technical/fs410.html (Glazing).
West and east windows will receive more solar radiation in summer than in winter – the opposite to what is desirable. They may perform best with a low SHGC. The best solution is operable shading that can be drawn in summer and opened in winter or shading screens that block summer sun which sets WSW, but admits winter sun which sets WNW.
Glass Insulation for West Windows

The three upper story west windows are now all double/triple glazed and will have heavy curtains fitted. However, the heat gain in summer due to direct sun is still huge and cannot be mitigated by exterior shades.
On 17 December 2012 we had insulating film installed on these windows by The Tint Professor using Enerlogic VEP35 film at a cost of $410.00. This is amazing stuff. Fitted to the inner surface of a double glazed unit, the unit rejects 66% of the total solar energy and absorbs 32% of it (it gets quite hot in the sun) yet does not radiate much of this into the room since the emissivity is only 0.07. The summer U value is 2.1 W/m²/K and the winter U value is 3.4 W/m²/K so it is quite effective in keeping winter heating in the room.
We chose VEP35 film rather than VEP70, more normally used for cooler climates, because of the specific solar problem. Its appearance is quite acceptable except perhaps in strong sunlight when it looks very mirror-like from outside. It looks good inside.


Update Mar17: The film has deteriorated badly. There are numerous small patches where the film seems to have broken down. Not recommended!
Patio Doors
Completed January 2014, these doors now have insulated glazed units made up of a 3 mm solarban 60 panel (on the outside), a 12 mm spacer and 4 mm clear float glass (on the inside).
I removed the original 4 mm laminated glass panes and routed the beading away. After painting the frames I nailed 6 mm painted quad 29 mm from the inside face of the frames using an air nailer, added the IGU that was supplied by Alligator Glass and made by G. James & Co., and held it there by nailing 6 mm painted quad, again using an air nailer.
I took the opportunity to swap hinges around to balance the wear, and cleaned and reinstalled the other polished hardware using brass screws instead of the rusted steel ones.
")
")

To seal the doors against the wind I first tried Raven RP59 but the doors would not close properly. Later on, I obtained some Raven RP7 in white and nailed this to the inside head and jambs so that it just made contact with the doors — a much better solution.


To seal where the two doors meet, Raven Astragal type RP16Si in bronze finish was screwed to the normally closed right-hand door. This has made the opening door hard to latch closed and may need further adjustment, but the seal is good.
Fly Screen
A retractable fly screen from Ultrascreen that stacks to the right has been installed. The Zig Zag model is a pleated screen that uses a string motor to retain the mesh. It requires a bottom track but this is only 7 mm high and I have recessed it in a groove by 5 mm into the sill so there is negligible trip hazard.

Ultrascreen were very accommodating, supplying the cassette and guides in "White Birch" with the bottom track in "Manor Red". The size ordered was 2098 mm high x 1502 mm wide. They provided a 7 x 27 mm bottom track fitted with a magnet strip to act as the left side receiver to make for a less intrusive fitting. Total cost was $642.40 delivered.

Installation was straightforward except for the method of restraining the bottom string. Ultrascreen provided a plastic sill bracket that should guide and clamp the string. But because the bottom track is recessed, there is no room for the bracket without modification. The string simply jumped out of the guide. Instead, I drilled a 45°hole through the head of a brass wood screw and threaded the string through that after installing the screw into the end of the sill track.
The plastic sill bracket was cut up so that the tension block could be mounted next to the left corner of the sill track.

Left: the supplied sill bracket and proposed threading.
Right: the tension block screwed to the floor at the end of the sill track with string passing to it through the brass wood screw.
The correct tension on the bottom and top strings is very important for obtaining smooth operation and uniform tracking of the zig zag mesh.
Pool Room Window
Measuring 1300 x 3430 mm, the window separating the pool room from the family room is very large and must likely be a major heat transfer agent. The pool room is very hot on summer days and cool on winter days. Reducing the heat exchange with the family room by double glazing is preferred to adding curtains.
At a price of $1320 Alligator Glass installed a second sheet of laminated glass 8.38 mm thick, 1293 x 3425 mm to make a double glazed unit. This sheet has a weight of 96 kg and took three men to carry and place in position.
I prepared the area by cleaning the existing laminated glass window. That took a couple of hours! It is evident that there were once two windows in the space with a vertical partition in the centre.
- I filled the gaps between the existing glass and the frame with silicone sealant;
 made up pine spacers 12 x 12 mm and tapered edging 10 x 8 mm; painted
these with undercoat and water-based enamel;
made up pine spacers 12 x 12 mm and tapered edging 10 x 8 mm; painted
these with undercoat and water-based enamel;- cut a groove in the bottom spacer to retain silica gel that I added just before final assembly;
 stuck brown Raven RP59 to the front and back faces of the spacers;
 and nailed the spacers in position with a nail gun.
")
")
")
")
Upon arrival of the new glass sheet, a test fit standing the sheet on 10 x 3 mm plastic spacers showed all would be well. The Alligator Glass guys cleaned the sheet while I laid down a bead of silicon sealer between the frame and the spacers. Once in postion, the sheet was held tight while the tapered edging, which I had already cut accurately to length, was nailed in position with the nail gun.
LINKS
- Alligator Glass http://www.alligatorglass.com.au
- Raven Products http://www.raven.com.au
- The Tint Professor http://tintprofessor.com.au
Glazing
")
Glass in the Pool roof. Frames were rotting, glass was deteriorating.
")
Pool room roof before new glass installed.
")
Crew replacing the glass in the pool room roof.
")
Pool room roof after new glass and solar panels.
")
The west windows on the first floor. The left one is for the Bedroom 3, the others (still to be repaired) are for Bedroom 2.
")
This picture is of the better of the two windows in Bedroom 2, showing the poor condition they are all in.
")
The completed Bedroom 3 window. The round central magnet is visibile towards the top.
")
Bedroom 3 window open.
")
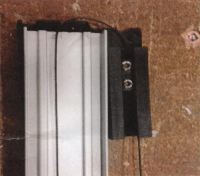
Glazing detail of Bedroom 3 west window. The insulated glass unit is held in the frame with black silicone, and the leadlight is on the outside, also siliconed into position.
")
Flyscreen detail showing the slot for the window stay, and the screen handle.
")
Flyscreen detail showing friction hinging.
")
Reconstructing the leadlight for Bedroom 2.
")
Patio doors with IGUs installed.
")
Patio screen door open. Stacked to the right
")
Patio screen door half open.
")
Patio screen door closed.
")
Pool window before double glazing.
")
Pool window double glazing completed; silica jell absorbing moisture.
All content is Copyright © 2014 Peter Manins - All Rights Reserved. Javascript Menu by Deluxe-Menu.com
LEGAL DISCLAIMER: Everything said on these pages are personal
thoughts and may not be factual or correct and must not be relied upon.
They are NOT recommendations to others.